Doa Test Kits Drug Test with CE and FDA
Shantou Gld Atrs & Craft Co, Ltd. / 2022-06-23
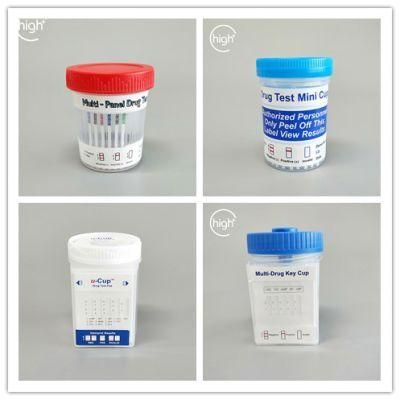
- Type:Test Strips & Test Tube
- Material:Plastic
- Ethylene Oxide Sterilization:Without Ethylene Oxide Sterilization
- Quality Guarantee Period:Two Years
- Group:Anyone in Need.
- Logo Printing:With Logo Printing
=== Base Info ===
- Transport Package:Carton
- Specification:Strip,Cassette
- Trademark:OEM
- Origin:China
- HS Code:3002190090
- Production Capacity:50000000PCS,Year
=== Description ===
For Strip
Remove the test strip from the sealed pouch and use it as soon as possible.
- Immerse the strip vertically into the urine specimen with the arrow end pointing towards the urine. Do not immerse the strip past the Max Line. See the illustration below.
- Remove the strip after 10 seconds and lay the strip flat on a clean, dry, non-absorbent surface, and then begin timing.
- Wait for colored lines to appear. Interpret the test results at 3-5 minutes. Do not read results after 10 minutes
For Cassette
- Remove the test cassette from the sealed pouch.
- Hold the dropper vertically and transfer 3 full drops (approx. 100ml) of urine to the specimen well of the test cassette, and then begin timing. See the illustration below.
- Wait for colored lines to appear. Interpret the test results at 3-5 minutes. Do not read results after 10 minutes.
For Dipcard
1. Remove the test card from the sealed pouch and use it as soon as possible.2. Remove the cap from the end of the test card. Immerse the strip(s) of the test card vertically in the urine specimen with arrows pointing toward the urine specimen. Immerse the test card to at least the level of the wavy lines on the strip(s), but not above the arrow(s) on the test card. See the illustration below.
3. Remove the test card after 10 seconds and lay the card flat on a non-absorbent surface, and then begin timing.
4. Wait for colored lines to appear. Interpret the test results at 3-5 minutes. Do not read results after 10 mins
For Multi-Drug Screen Test Cup
- Remove the test cup from the sealed pouch and use it as soon as possible.
- Donor provides specimen and secures the cap by pressing down on all three corners.
- On a flat surface, technician pushes key to a fully closed position.
- Peel off the label on the multi-drug test card to view results. The test is read in the reaction well.
- Start the timer and wait for colored lines to appear. Interpret the test results at 3-5 minutes. Results remain stable for up to sixty minutes. See the illustration below. For detailed operation instructions, please refer to the Procedure Card
Results Interpretation: Negative or Positive Indication
Negative:Two lines appear. One red line should be in the control region (C), and another apparent red or pink line adjacent should be in the test region (T). This negative result indicates that the drug concentration is below the detectable level. (*Note: The shade of red in the test line region (T) will vary, but it should be considered negative whenever there is even a faint pink line.)
Positive:One red line appears in the control region (C). No line appears in the test region (T). This positive result indicates that the drug concentration is above the detectable level.
Invalid:Control line fails to appear. Insufficient specimen volume or incorrect procedural techniques are the most likely reasons for control line failure. Review the procedure and repeat the test using a new test panel. If the problem persists, discontinue using the lot immediately and contact your local distributor.


New product
Hot product
- Gm Candi Interface
2022-06-23
- Scan Dash V2.0 for BMW
2022-06-23
- K+Can Commander 2.0
2022-06-23
- Mut-3 Professional Diagnostic Tool Mut3
2022-06-23
- CKM-100 Key Programmer for Benz/BMW
2022-06-23
- Fuel Injector Tester & Cleaner (MST-N6A)
2022-06-23
- Mst 9000+ Plus ECU Simulator
2022-06-23
- OBD Ii Code Reader Mst-300, OBD2 Code Scanner
2022-06-23
- Digital Battery Analyzer (SC-100)
2022-06-23
- VAS5052A PC VERSION with VAS5054A Wireless Bluetooth Communicate
2022-06-23

